Starting to learn Max/Msp from
scratch could be a little difficult. In my opinion a student should
have at least the following background knowledge:
Here "basic knowledge" means the
student must understand the concepts. A deep or mathematical skill is
good but not required. Knowledge of the way a filter or an FFT works is
not required. But the student must know what a filter or an FFT does.
Max/Msp is a virtual synthesizer on which you must build your own
instruments and effects connecting basic modules, so the knowledge of
other synthesis system (e.g. CSound) is very helpful.
A general skill on using and connecting mixers, effects box and studio
equipment is very useful.
Last but not least, the user must be acquainted with the windows/mac
editing modes (edit box, menus, copy, paste, etc).
The real, operating difference
between Max and Msp modules is that the former work in asynchronous way
(i.e. the computation is made only when a message comes) and the latter
work in synchronous way at the SR speed (i.e. if the SR is 44100, then
a new value is computed 44100 times each second).
For instance, with a SR = 44100 (the standard), the Msp multiplier
operator (*~) computes its result 44100 times each second. The aim of
this module is multiplying two signals or a signal and a number. The
result is another signal with 44100 samples per second.
On the contrary, the Max multiplier operator (*) computes its result
once and outputs a single number. If you need to multiply a frequency
value by 2 (to calculate the 8ve) and pass the result to a cycle~
object, computing 44100 times the same number is stupid and CPU
consuming, so it's better to use the Max multiplier instead of the Msp
multiplier.
The first patch is very simple. It's
only a single oscillator connected to output, but you will learn some
interesting things about the way Msp handles the connections with your
sound board via dac~ object. Now open a new patcher windows (File ->
New -> Patcher).
The modes
The patcher opens in Edit mode. In this mode you can add new objects to
the patch dragging from the palette that appears on the upper part of
the window. You can also connecting, move and edit objects already
placed in the window.
The other is the Play mode. In Play mode the patch is locked: you can't
edit. The palette disappear. You can only play and act on the objects
that allow a real time interaction.
You can switch between the Edit <-> Play modes with
- the Edit menu
- the key Ctrl-E
- Ctrl- left click in the patcher windows
The palette
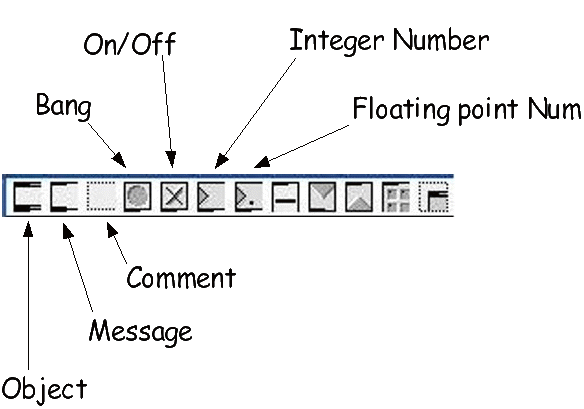
Now stay in Edit mode and look at the Max/Msp palette:
As you can see, there are many
different object icons in
the palette. The ones on the left are the most commons. To put an
object in the patcher window, first click the icon on the palette, the
click everywhere in the window.
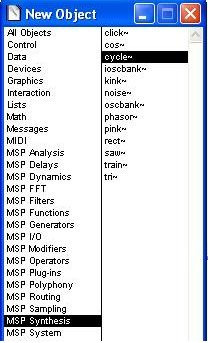
Now click the Object icon (the first on the left) and place it into the
patcher window. The module list will open (see it on the right).
On the left you find the object category, on the right the objects
name. If you don't remember the category where an object belong, select
the first (All Objects) and go through the very long alphabetical list
on the right.
Suggestion
You can use this box to begin exploring the category list. It's a good
idea to get acquainted with the categories contents because by this way
you can understand how many objects exist and guess their meaning.
For
instance, looking at the "MSP Synthesis" category, you see objects that
make basic waves for sound synthesis. Depending on your skill in
electronic music, you could guess that click~ could be a single pulse
generator, cycle~ could cycle a stored wave, noise~ is a noise
generator, oscbank~ is for sure an oscillator bank and so on...
You can then search the MSP and Max Reference manuals to see how each
object works.
Patching step-by-step
Now select the "MSP Synthesis" category and double-click the cycle~
object. Place the cycle~ into the patcher window and insert a space
followed by frequency value in Hz (e.g. cycle~ 220 or 440). Click on
the window outside the object and see the cycle~ automatically resizing.
Then place another object under the last one: select the dac~ from MSP
I/O category. This is the output object, the real connection
between the software and the sound board outputs. Write nothing
in and click
outside the object box.

Now take
a closer look at cycle~ object. You'll see 2 black lines on the left
and right of upper border and one black line on the left of lower
border.
The uppers are called "inlets" and are input connections for signals
and
control messages. Each module can have a different number of inlets
with different meaning. For instance, in the cycle~,
- the left inlet controls the frequency;
- the right inlet controls the phase of the wave.
so, connecting something to left inlet we can change the frequency in
real time (we'll do later).
The lowers are the "outlets" and are the outputs from the module. The
cycle~ has only one outlet carrying the audio signal.
If you move the mouse near each inlet/outlet, Max makes the
inlet/outlet thicker and its function is displayed on the lower left of
the Max window.

Now connect the cycle~ to the left inlet of the dac~. To create the
connection, move the mouse near the cycle~ outlet (it becomes thicker)
then click and drag the wire to the dac~ inlet. You'll see that, when
the mouse approach the dac~'s inlet, this one becomes thicker and
attracts the connection wire.
Ok, you've made it! Now the cycle~ is connected to the left output. The
default dac~ (with no arguments) has 2 inlets that are internally
connected with output 1 & 2 (normally left & right) of your
soundboard.
The very simple patch is done, but you can't hear any sound until you
turn on the dac~.
Now save this patch (File -> Save as) giving it a name.
 The messages
Messages are the way you send commands to Max/Msp objects. Each
object understands his
own messages only. If you send the wrong (not understood) message to an
object, an error message appears on Max window.
A message can be
- a single word (e.g. "start", "stop", "next", "foo", "bar")
- a number (integer or floating, e.g.
"440", "320.25")
- a list
including text and numbers separated by blanks (e.g. "100 1000 2000
530", "note 0 60 72").
In Edit mode, a message is displayed as a box with the message text
inside. In Play mode, the box becomes a button: when you click the
button, the message runs through the connection wire reaching its
destination.
To insert a message, select the 2nd icon on the palette and click on
the patcher window. This time no list appears: you must know the
message
text you have to insert. You can find a list of messages that each
module understand on the Reference manuals.
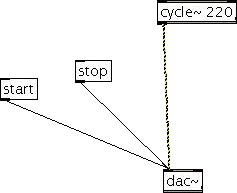
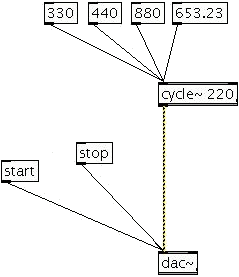
Now we'll set up the messages to turn on/off the sound. Create 2
messages labelled "start" and "stop" and connect to the left inlet of
dac~ (see image). Now switch to Play mode (menu-> edit or Ctrl-E)
and click start. You will ear a sine tone at 220 Hz. Clicking stop you
turn off the sound.
As you see the same inlet can receive signals and/or messages.
 Sending messages to the cycle~
In the same way you can send messages to any object. Of course you must
know what kind of messages are meaningful for the object.
It's easy to think about each message as a command. When an object
receive a
command it performs the associated action, if any.
For instance, in the dac~ object there are actions associated with the
"start" and "stop" messages (turning on/off the dac itself), but there
is no action associated with the message "foo". If a dac~ receive the
"foo" message it does nothing and an error message is written on the
Max window (try it).
The cycle~ object has no action associated with messages
like "start" or "stop" because, as the oscillators in a synthesizer,
the cycle~ is always playing.
Instead in the cycle~ an action is associated with numbers (integers or
floats).
The cycle~ understands each number as a frequency in Hz, so sending a
cycle~ a
message like "440" trigger the action "setting frequency to 440 Hz".
Now you can try sending numbers to the cycle~, as in figure, and hear
the cycle~ changing frequency. You must note that the messages override
the value written in the cycle~ itself (220).
I don't want to go blind
In Max the font dimension can be very little with an high resolution
screen.
To change the font dimensions and/or type open a new patcher windows.
Before inserting any object choose a new dimension on the Font menu.
The dimension you selected affects the new objects only.
If you already have some object in the window, first select all (Edit →
Select all), then click an object with the
right mouse key and
select "Fix width".
A useful patch: comparing scales
Cycle~ and dac~ are only a few objects to work with, but we can also
try to create an interesting patch.
First we will build a little musical keyboard. This chart shows the
frequencies in Hz for the notes in the temperate system (the piano
extension
is in brown).
|
-1
|
1
|
2
|
3
|
4
|
5
|
6
|
7
|
8
|
9
|
|
C
|
16.35
|
32.70
|
65.41
|
130.81
|
261.63
|
523.25
|
1046.50
|
2093.00
|
4186.01
|
8372.02
|
|
C#/Db
|
17.32
|
34.65
|
69.30
|
138.59
|
277.18
|
554.37
|
1108.73
|
2217.46
|
4434.92
|
8869.84
|
|
D
|
18.35
|
36.71
|
73.42
|
146.83
|
293.66
|
587.33
|
1174.66
|
2349.32
|
4698.64
|
9397.27
|
|
D#/Eb
|
19.45
|
38.89
|
77.78
|
155.56
|
311.13
|
622.25
|
1244.51
|
2489.02
|
4978.03
|
9956.06
|
|
E
|
20.60
|
41.20
|
82.41
|
164.81
|
329.63
|
659.26
|
1318.51
|
2637.02
|
5274.04
|
10548.08
|
|
F
|
21.83
|
43.65
|
87.31
|
174.61
|
349.23
|
698.46
|
1396.91
|
2793.83
|
5587.65
|
11175.30
|
|
F#/Gb
|
23.12
|
46.25
|
92.50
|
185.00
|
369.99
|
739.99
|
1479.98
|
2959.96
|
5919.91
|
11839.82
|
|
G
|
24.50
|
49.00
|
98.00
|
196.00
|
392.00
|
783.99
|
1567.98
|
3135.96
|
6271.93
|
12543.85
|
|
G#/Ab
|
25.96
|
51.91
|
103.83
|
207.65
|
415.30
|
830.61
|
1661.22
|
3322.44
|
6644.88
|
13289.75
|
|
A
|
27.50
|
55.00
|
110.00
|
220.00
|
440.00
|
880.00
|
1760.00
|
3520.00
|
7040.00
|
14080.00
|
|
A#/Bb
|
29.14
|
58.27
|
116.54
|
233.08
|
466.16
|
932.33
|
1864.66
|
3729.31
|
7458.62
|
14917.24
|
|
B
|
30.87
|
61.74
|
123.47
|
246.94
|
493.88
|
987.77
|
1975.53
|
3951.07
|
7902.13
|
15804.27
|
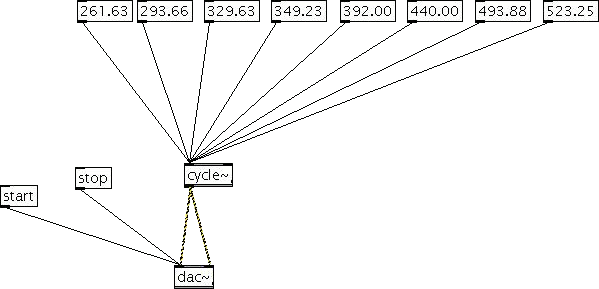
Now we can build a patch to play a major scale from C4 to C5. It's
easy. Simply place a message that send the frequency for
each note to build your personal keyboard (see image below).
You can select the message boxes and align with the right-click menu.
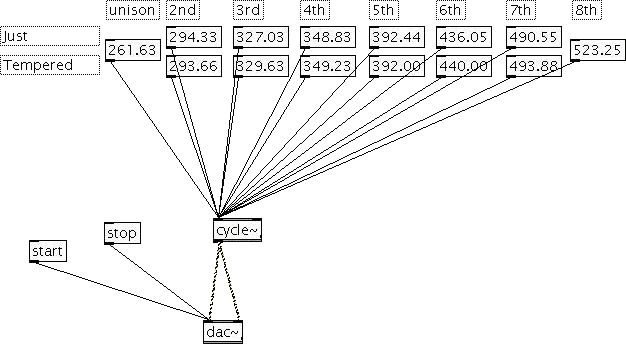
This is a very simple patch without envelope (push start and stop to
turn the sound on/off), but we can make it more interesting comparing
two scales: the equal temperament and the just scale (sometimes
referred to as
"harmonic tuning" or "Helmholtz's scale") more strictly related to the
harmonics (click
here to read
more about the Just Scale).
The table below shows the differences between the intervals in the just
and tempered scales.
| Interval |
Just Scale
ratio
|
Equal Temperament
ratio
|
| Unison |
1.0000 |
1.0000 |
| Minor Second |
25/24 = 1.0417 |
1.05946 |
| Major Second |
9/8 = 1.1250 |
1.12246 |
| Minor Third |
6/5 = 1.2000 |
1.18921 |
| Major Third |
5/4 = 1.2500 |
1.25992 |
| Fourth |
4/3 = 1.3333 |
1.33483 |
| Diminished Fifth |
45/32 = 1.4063 |
1.41421 |
| Fifth |
3/2 = 1.5000 |
1.49831 |
| Minor Sixth |
8/5 = 1.6000 |
1.58740 |
| Major Sixth |
5/3 = 1.6667 |
1.68179 |
| Minor Seventh |
9/5 = 1.8000 |
1.78180 |
| Major Seventh |
15/8 = 1.8750 |
1.88775 |
| Octave |
2.0000 |
2.0000 |
From this table we can easily compute the frequencies of the notes in
the equally tempered and just scales.
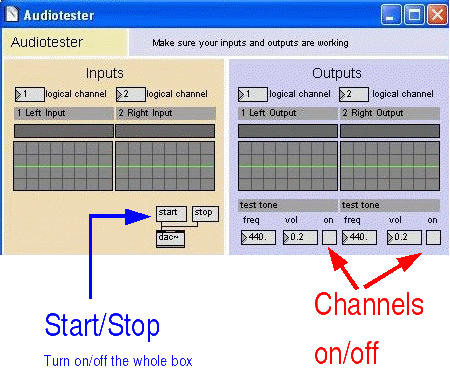 Installing and configuring Max/Msp
on Windoze/Mac is easy
if your system already play sounds. I never found problems to install
Max and get sounds on a properly configured system.
 As you can see, there are many
different object icons in
the palette. The ones on the left are the most commons. To put an
object in the patcher window, first click the icon on the palette, the
click everywhere in the window.

 The messages
 Sending messages to the cycle~